You are here: Home >> Polymer Clay Pendant Projects > Dots and Doodles Polymer Clay Pendant Tutorial
Dots and Doodles Polymer Clay Pendant Tutorial
In this polymer clay pendant tutorial
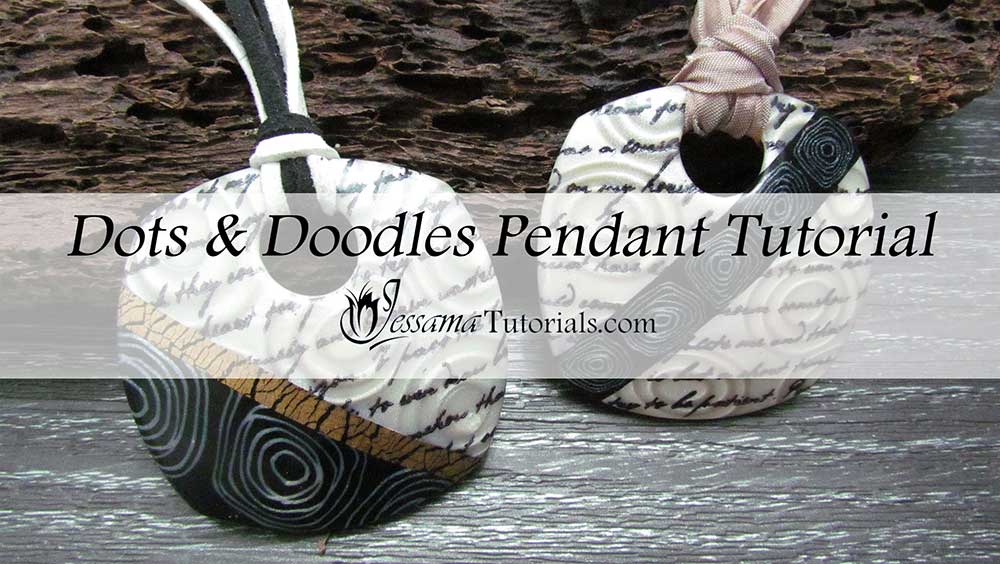
I’ll show you how to make two beautiful pendants using the doodle rose cane and some simple ink stamping over a mica shift.
This is an easy but very effective polymer clay project, and can be adapted to create many different designs.
The link to the Doodle Rose Cane is in the suggested links box below the video.
You will need the following supplies:
- A doodle rose cane
- Pearl white polymer clay
- Gold leaf
- Jet black Stazon ink
- Lisa Pavelka’s love letter stamp
- A tissue blade
- A pasta machine
- An acrylic roller
- An oven
- A craft knife
- Rounded square cutters
- Mini circle cutters
- Cling wrap
- A piercing pin
- A jar for doming
- Translucent kato liquid clay
- A heat gun
- Sari ribbon
- Black and white suede cord
- Four crimps
- Four jumprings
- Pliers
- Two clasps
Dots and Doodles Polymer Clay Pendant Tutorial Step by Step
- To start this polymer clay pendant tutorial you’ll need the doodle rose cane from part one of this tutorial.
- You'll also need a conditioned sheet of pearl white polymer clay. The sheet should be rolled out on the thickest setting of your pasta machine and then doubled up and trimmed neatly.
- Use some small circle cutters of various sizes to make a rose pattern across your clay sheet. I'm using the mini circle cutters from JessamaDesign.
- Press your clay back together and flatten out with your acrylic roller.
- Flip your clay over and push down to stick to your tile.
- Slice with your tissue blade to create a mica shift. Check out my Mica Shift Tutorial for more information.
- Roll through the pasta machine on the thickest setting.
- Rotate and roll through the next setting down.
- I'm using the Lisa Pavelka Love Letter stamp and black Stazon ink.
- Ink up your stamp, flip it over and press down gently onto your mica shift.
- Reduce your doodle rose cane to a good size for the pendant that you have chosen to make. Trim up the ends.
- Cut it in half, fit the pieces together. Cut in half again and place together to make a strip.
- Use your roller to gently work the pieces together.
- Use your tissue blade to cut slices from your cane around the same thickness as your mica shift sheet.
- Square up the edges of two slices and lay them end to end.
- Roll together with your acrylic rod and press the sides in, using something like a ruler to create a straight strip.
- Set aside.
- Cut your mica shift sheet in half on the diagonal.
- Move one piece aside.
- Lay your doodle rose cane strip next to the mica shift and use your ruler to push it up against it.
- Lay the second half of your mica sheet next to it.
- Cover with plain printing paper and burnish using your finger tips. Finish off by burnishing with the roller.
- Cover your clay with clingwrap. Position your cutter and cut out a pendant. I am using my rounded square cutters, but you can use any shape you like.
- Before removing the clingwrap, use a small circle cutter to cut out a hole near the top of the pendant.
- Remove the clingwrap and excess clay and use your craft knife to remove the circle.
- Trim up the edges using your tissue blade.
- Lift up your polymer clay pendant piece using your tissue blade and lay on a domed surface for baking. I use a glass jar.
- Smooth using the heel of your hand and use your blade to smooth the edges.
- Bake for an hour at Premo's recommended temperature.
- On the video I show another variation of this pendant, so be sure to check it out.
- Take the leftovers of your sheets and cut them in strips. Lay the strips next to one another and burnish together as you did with the front. The resulting sheet will form your backing.
- Add Bake and Bond to the back of your baked pendant and smear across the surface.
- Lay your backing sheet on the back of the pendant. Press down and push quite hard around the edges.
- Smooth the sheet over the edges and trim using your craft knife.
- Smooth the edges with your fingertips and smooth over the back to get rid of fingerprints.
- Lay on a cloth or a bed of tissue and bake for 40 minutes on Premo's recommended temperature.
- Coat with a layer of liquid clay or other varnish. You can find out how to coat with liquid clay on my Patreon liquid clay tutorial.
- Cut two lengths of Sari ribbon. Fold them in half. Thread the loop through the hole in the pendant, then thread the ends of the ribbon through the loop to create a knot.
- Trim the pieces to the same length.
- Add a large crimp bead to either end and squeeze tight using your pliers.
- Add a jumpring and one half of a clasp to each crimp bead.
I hope you enjoyed that tutorial. Try different combinations with the veneers to create different effects.
Suggested links
- Doodle Rose Cane
- How to Make a Mica Shift
- Rounded Square Cutter Set
- Mini Circle Cutter Set
- Liquid Clay Tutorial on Patreon
- Debbie Crothers Liquid Clay Tutorial
If I have missed something, or you still have questions, please leave a comment below.
You can like my Facebook page or join the Jessama Tutorials Polymer Clay Community on Facebook to stay up to date with more polymer clay tutorials like this one as they are released.
You may also like:
You are here: Home >> Polymer Clay Pendant Projects > Dots and Doodles Polymer Clay Pendant Tutorial



Please leave your comments below: