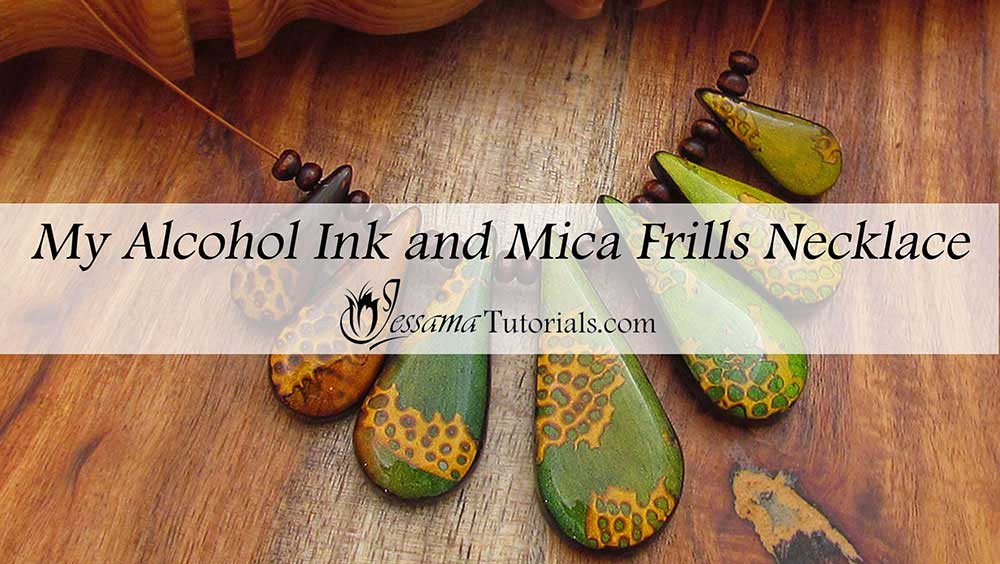
Polymer Clay Necklace with Alcohol Ink and Mica Frills
In this polymer clay tutorial
I’ll show you how to take a block of clay, add alcohol inks and turn it into a beautiful
polymer clay necklace.
It’s a really fun project that can be remade in many
different ways, so be sure to play around and see what else you can do with
this addictive polymer clay jewelry tutorial.
You will need the following supplies:
- A pasta machine
- An acrylic roller
- A tissue blade
- A spray bottle filled with water
- Some pebble stamps (I'm using Melanie Muir's River and Mountain stamps)
- An oven
- Graduated teardrop cutters
- Coarse sandpaper
- A hand drill (You can also use a powder drill or a piercing pin)
- Adirondack alcohol inks (For this project use Bottle Green, Botanical, Citrus, Ginger and Teakwood. I used more in the tutorial, but this is basically what you need.)
- 99% alcohol or Blending Solution
- Medium and small paint brush
- Small container for alcohol
- Gold polymer clay (I’m using Premo, but any brand or color will do)
- Black polymer clay
- Wet/dry sandpaper or polishing cloths
- Resin (I’m using Ice Resin)
- A measuring cup and a stick (For measuring and mixing the resin)
- Accu-flex beading wire, 49 strand, softest drape, 0.6mm diameter, color: copper (This is the type of accu-flex I use)
- Two antique copper jumprings
- Two antique copper crimps
- Two antique copper charlotte crimps
- Antique copper clasp
- 16 wooden rondelle beads
- Flat nose pliers
- Flush Cutters
Alcohol Inks and Mica Frills Polymer Clay Necklace Step by Step
- To start this polymer clay necklace project you’ll need a conditioned sheet of polymer clay. I’m using Premo Gold because I love how the metallic particles shimmer through the alcohol ink once resined.
- The sheet should be rolled out on the thickest setting of your pasta machine and you’ll need enough to cut out seven beads.
- Paint your clay with stripes of alcohol ink moving from one side of your color pallet to the other. I’m using a green and brown pallet for this project, but you can use any colors you want. Basically you want to have a blend of all the colors like a Skinner Blend. See the video tutorial for multiple tips on how to get a smooth blend.
- Once you’ve got a blend, take a small paint brush and dip it into the 99% alcohol. (You can also use blending solution but it doesn't work as well.) Drip the alcohol onto your alcohol ink blend. This will form a spot. Drip the alcohol all over the sheet to create multiple spots. Now you need to let that dry.
- You need another sheet of Premo Gold polymer clay rolled through on the thickest setting of your pasta machine.
- Lay your stamp face up on your tile. Spray it with water. Now take your gold clay and lay it on top of the stamp. Spray the top of the clay with water. Now press the clay into the stamp. Lift the clay from the stamp and dry up the water.
-
Now you need to shave the top off. This is the part you want, so be as careful as possible to get nice pieces.
Check out my Mica Shift Tutorial for more information. - Once you’ve built up a whole lot of mica frill pieces, you can lay those over the top of your alcohol ink sheet. Be creative and have fun.
- Flatten the sheet a little using your acrylic roller. Clean your roller after each pass. Be careful not to let the alcohol ink get onto your mica frills.
- Cut out your beads and bake at the recommended temperature for half an hour.
- Roll a sheet of black polymer clay through the thickest setting on your pasta machine.
- Texture the black clay using coarse sandpaper.
- Use your cutters to cut out backings for all of your beads.
- Carefully match your baked and cooled beads with a textured backing.
- Rebake your beads for another half an hour.
- Wait for the beads to cool and then warm up a piece of black clay by rolling it in your hands. Once warm take a small piece of the black clay and smear it along the edge of your beads. It will clean up the edges by making them black and filling in any holes.
- Bake them again for a full hour at the recommended temperature.
- Sand the edges of your beads using the lighter grits of sandpaper or polishing cloths.
- Place your beads on a silcone mat ready to resin. Mix up your chosen resin and pour it onto your beads. Please watch the tutorial for more information and tips.
- Let the resin cure for twenty four hours.
- Drill your beads with a hand drill. You can drill them anywhere you want.
- Cut a length of accu-flex. I like 16” long. String on a charlotte crimp and then a crimp. Leave a small tail of string and then squish the crimp. Bring the charlotte crimp back up and close it around the crimp. Open a jump ring and link that through the hole in the charlotte crimp. Put your clasp onto the jump ring and close the ring.
- Now you’re set to string. I like to put two wooden rondels and then a polymer clay bead and repeat until I reach the end of all the wooden rondels.
- To finish your polymer clay necklace just repeat the steps with the charlotte crimps and clasp above.
In the video tutorial I show a lot of different tips and tricks to help get the most out of the process, so please do take a look at that.
Suggested links
Buy Supplies
If you are struggling with the Ice Resin, you can find a full Tips and Techniques tutorial that walks you through the process on my Patreon community page or in my Etsy Shop.
If I have missed something, or you still have questions, please leave a comment below.
You can like my Facebook page or join the Jessama Tutorials Polymer Clay Community on Facebook to stay up to date with more polymer clay tutorials like this one as they are released.



Please leave your comments below: