You are here: Home >> Polymer Clay Jewelry Projects > Silent Night Snowflake Cane Tutorial
Silent Night Polymer Clay Snowflake Cane Tutorial
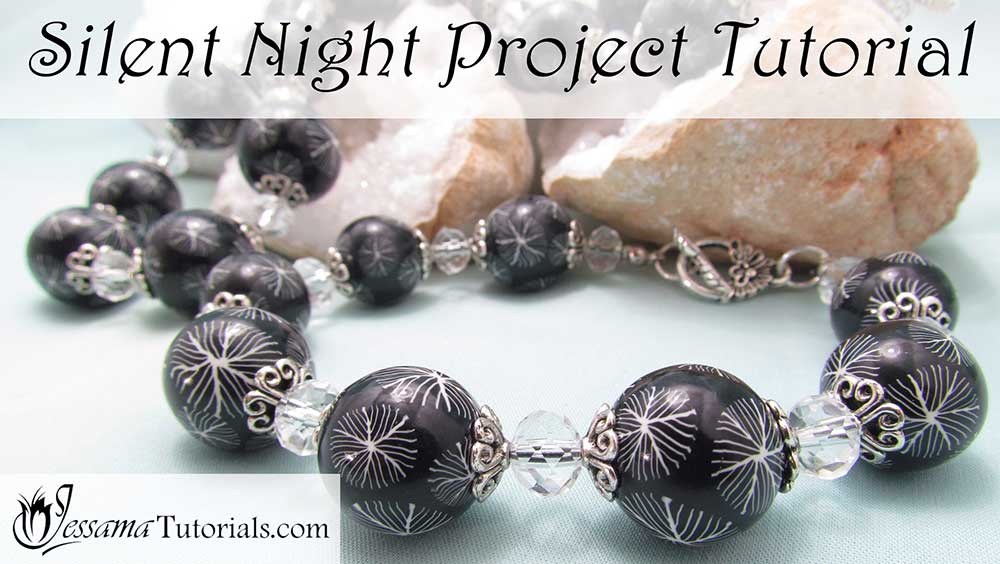
In this tutorial we will be making a simple, but really pretty, polymer clay snowflake cane. I'll show you how to make it, reduce it to various sizes and how to use it to make the stunning silent night beads that this project is named after.
This polymer clay cane is really easy to make, but so effective. Please do give it a try. It's great fun and produces a beautiful and rewarding result.
You will need the following supplies:
- Black, translucent, white polymer clay (Premo)
- A tissue blade
- A pasta machine
- An acrylic roller
- An oven
- Varathane or other Varnish
- Wire
- A pin drill
- Silver bead caps
- Clear crystal rondels
- Accu-flex
- A silver clasp
- Silver charlotte crimps
- Silver crimps
- Silver Jumprings
- Silver headpins
- Clear seed beads
The Silent Night Polymer Clay Snowflake Cane Project Step by Step
Making The Snowflake Cane:- To start you’ll need a triangular block of black Premo polymer clay. The block should be 4cm on each side and 4 cm long.
- You will also need two sheets of white Premo rolled out to 1.5mm thick.
- Wrap two sides of the black triangle in white. Trim away excess clay and make sure the clay is well stuck together.
- Place your triangular log with the black side on your work surface and cut lengthwise through the middle of it.
- Cover one of the newly cut, black surfaces with white. Remove excess clay.
- Place the two triangle pieces back together again.
- Slice one side of the triangle off and insert a layer of white as before. The idea is to continue inserting white sheets until there is no more space.
- Squish the clay back into a triangle.
- Reduce the triangular cane to about 18cm long after you have removed the distorted ends.
- Cut into six 3cm pieces.
- Place the pieces together to form a hexagon. (see the video)
- Press the pieces together.
- Trim off the ends and allow to rest.
- Round into a log.
- Reduce your cane further. Cut it into pieces and reduce to various diameters.
- Roll out a bunch of balls all the same size to make necklace beads. Roll out some more smaller ones for a bracelet and some smaller ones for earrings.
- Cut several thin slices from each of your polymer clay snowflake canes.
- Place several cane slices around each ball being careful not to let the slices touch.
- Wearing gloves, roll the balls in your palms until all the slices are flattened and there are no seams.
- Place the beads on tissues for baking at the recommended temperature for an hour.
- Use a pin or push drill to drill a hole through the center of each bead.
- Thread the beads onto a piece of wire and dip them in your varnish, or use a brush. (See the video for the process I use.)
- Each bead will require about three coats.
- When the varnish has dried, remove your beads from the wire.
- Cut a length of stringing material. I am using Accu-flex.
- Add your crimps and clasps to one end of the cord.
- Start with a glass rondelle, then a bead cap, then a polymer clay bead then the second bead cap. Repeat until your necklace is complete.
- Finish off the other end with your charlotte crimp and clasp.
In the video tutorial I also show how to make a simple pair of earrings, so please do take a look at that.
Suggested links
- How to Reduce your Polymer Clay Canes Correctly
- Heart of the Ocean Lentil Bead Scrap Cane End Tutorial
- More Leftover Scrap Techniques
- Karina Formanova's Home Made Bead Rack
If I have missed something, or you still have questions, please leave a comment below.
You can like my Facebook page or join the Jessama Tutorials Polymer Clay Community on Facebook to stay up to date with more polymer clay tutorials like this one as they are released.
You may also like:
You are here: Home >> Polymer Clay Jewelry Projects > Silent Night Snowflake Cane Tutorial


Please leave your comments below: