Waterfall Crackle Polymer Clay Necklace Tutorial
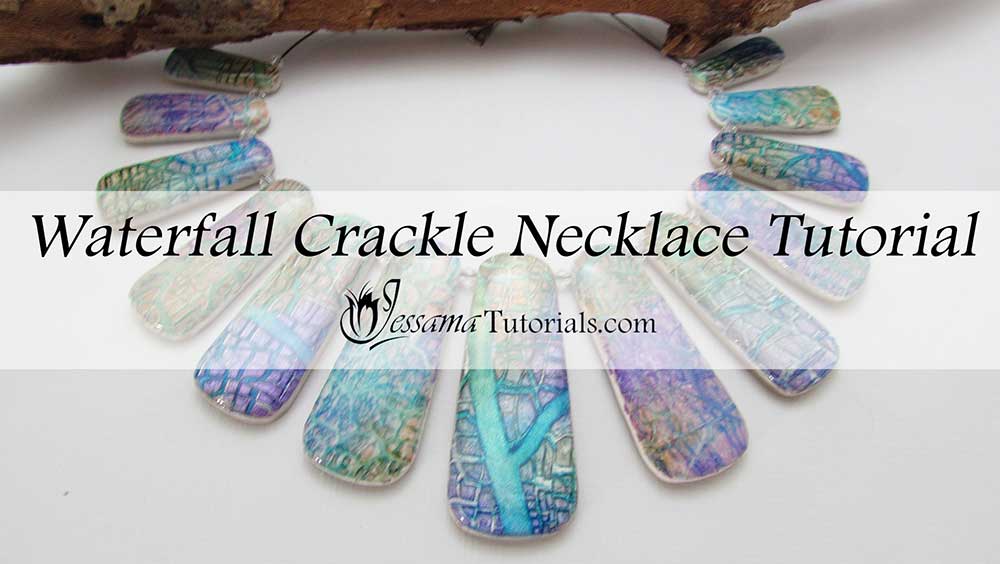
In this polymer clay necklace tutorial we’ll make two different necklace designs using the
waterfall crackle sheets we made in a previous tutorial. One will be elegant
while the other will be more tribal. There are so many ways you can use this
crackle technique and I hope these two designs will give you some ideas.
You can find the link to the crackle sheet tutorial in the suggested links box below the video.
You will need the following supplies:
- Waterfall crackle sheets
- Pearl white polymer clay
- Cutters (I'm using my Silos, Maxi Silos, Waterfall Daggers, and Maxi Waterfall Daggers)
- A tissue blade
- A pasta machine
- An acrylic roller
- An oven
- A craft knife
- Plain printing paper
- A ceramic tile
- A pin drill
- Sandpaper
- Ice resin
- Suede
- Jumprings
- Clasps
- Bone beads
- A bail
- Crystal beads
- Black Accu-flex
- Cord ends
Waterfall Crackle Polymer Clay Necklace Tutorial
- To start you’ll need your crackle sheets from the previous tutorial. Each should be the same thickness before starting.
- Place a sheet of pearl white polymer clay rolled out on the thickest setting of your pasta machine onto the back of your crackle sheets. Trim away any excess bits of pearl white. Burnish the backs with a piece of plain printing paper to smooth them out.
- Now we’re ready to start cutting out our pendants. I’ll start with the darker sheet which had Denim, Latte and Eggplant alcohol ink on it. Work on a sheet of plain printing paper to prevent shiny spots on the back.
- I cut out a pendant using the smallest cutter in my Maxi Waterfall Dagger set. Trim away any excess clay that might be left around the pendant and smooth off the sides with your finger.
- Use the two smallest cutters in the Waterfall Daggers set to cut out four more pendants.
- Place these on a sheet of plain printing paper.
- Now I’ll use the smallest cutter from my Maxi Silos set and the six largest from my Silos Cutters set for the other two sheets. Cut out your pendants just like before in the pattern you like, trim the edges and smooth.
- Place on a piece of plain printing paper with the other pendants and lay a sheet of greaseproof or waxpaper over the top.
- Take a ceramic tile and lay it face down over the greaseproof paper and put the pendants in the oven for 45 minutes at your brands recommended temperature.
- Once cool, sand the backs and edges of your pendants with sandpaper, working your way from a 400 grit up to your highest grit.
- Place your pendants onto a silicone waffle mat and apply a layer of Ice Resin. (You can also use Magic Gloss.) Let this cure for 24 hours.
- Once cured, use a pin drill to drill a hole through the tops of your Waterfall Dagger Pendants. Drill a hole through the sides of your Silo pendants.
- To start you’ll need an 18 inch long piece of black accu-flex. Crimp a crimp on one of the ends of the accu-flex. Slide a charlotte crimp up the other end and close around the crimp. Link a jumpring through the charlotte crimp's loop and slide a clasp onto the jumpring. Close the jumpring and one end is finished. Repeat this for the other end when you’re finished stringing your beads.
- String one crystal bead and one of your Silo pendants, repeat until you’ve used up all your Silo pendants.
- Repeat step one on the other end of the accu-flex. Just slide your charlotte crimp onto your accu-flex before crimping your crimp this time.
- For the waterfall necklace you’ll need an 18 inch long piece of suede matching your pendants. Crimp one end of the suede with a cord end and attach a jumpring and clasp.
- Now link a jumpring through the top of each of your Waterfall pendants. Attach a bail to the top of the jumpring in the largest pendant.
- String on three bone beads then a pendant and repeat until you’ve used up all your pendants.
- Squish another cord end on the other end of the suede and attach a jumpring and clasp.
Suggested links
- Waterfall crackle
- Alcohol ink crackle
- Silos cutters
- Maxi Silos cutters
- Waterfall Dagger cutters
- Maxi Waterfall Dagger cutters
You can also find push and pin drills on eBay.
If you are struggling with the Ice Resin, you can find a full Tips and Techniques tutorial that walks you through the process on my Patreon community page or in my Etsy Shop.
If I have missed something, or you still have questions, please leave a comment below.
You can like my Facebook page or join the Jessama Tutorials Polymer Clay Community on Facebook to stay up to date with more polymer clay tutorials like this one as they are released.



Please leave your comments below: