Starry Night Polymer Clay Jewellery Tutorial
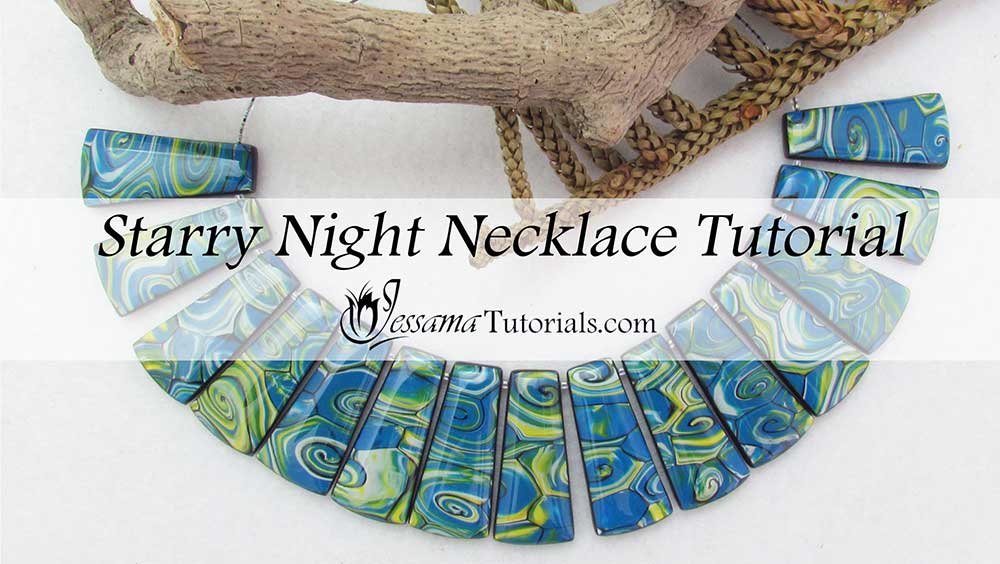
This Starry Night Polymer Clay Jewellery set is a spin on Vincent Van Gogh's Starry Night painting. This is one of my favorite of his works and I thought that I would love to capture it in polymer clay.
I created pendants in a full collar design in order to do justice to the panorama of the Starry Night.
You will need the following supplies:
- Polymer clay (I’m using Premo cobalt, zinc yellow, white and black)
- A pasta machine
- An acrylic roller
- A tissue blade
- An oven
- Shape cutters (I'm using my Cleopatra set)
- A texture for the backs of the beads (I'm using sponge)
- Wet/dry sandpaper/ polishing papers
- A hand drill
- A cloth
- Renaissance wax
- Ice Resin
- A clasp
- Two jumprings
- Two crimps
- Two charlotte crimps
- Clear seed beads
- Black accu-flex beading wire, 49 strands, softest drape.
- Round nose pliers
- Flat nose pliers
- Flush cutters
Making Starry Night Polymer Clay Jewellery Step by Step
Making the Starry Night Veneer:- To start you’ll need a roughly equal amount of Premo Zinc Yellow and Premo White and twice the amount of Premo Cobalt Blue rolled into logs.
- Chop each log into rough pieces.
- Squish the pieces together and roll into a log.
- Roughly chop again, squish together again and compact into a log.
- Roll a sheet of black polymer clay through the middle setting of the pasta machine.
- Lay the log on the black sheet and trim up the sides of the sheet so that it is the same width as the log.
- Wrap the log with the black sheet.
- Roll your log to eliminate air bubbles and reduce to around a 1cm diameter.
- Cut your log into pieces around 3cm in length.
- Taper one end of each piece and roll them into snails.
- Place all of your snail pieces together to form a sheet, alternating with longer snakes and smaller snails. See the video for the process.
- Roll your whole sheet flat using your acrylic roller.
- Shave off the black layer from the top of your sheet using your flexible tissue blade to reveal the starry night pattern.
- Run the sheet through your pasta machine on the thickest setting.
- Run the sheet through again on the second thickest setting to flatten it out.
- Use a cutter of your choice to cut out your pendants. I'm using a cutter from my Cleopatra Collar set.
- I cut out around 20 pieces.
- Run over the pieces lightly with your fingertips to remove fingerprints and bake for 15 minutes at the recommended temperature just to set them.
- Roll out a sheet of black Premo on the thickest setting and lay it on your work surface.
- Lay your cooled, baked pieces on the black clay and cut around them again using your cutter.
- Tidy up the edges and trim if necessary.
- Texture the backs. I will be using a piece of foam.
- Bake them again for a full hour at the recommended temperature.
- Finish off the sides using the Jessama Smear Technique.
- Bake again for half an hour at the recommended temperature.
- When cooled, sand the front, back and sides using your wet/dry sandpaper or polishing papers. Start from the lowest grit, in my case 400, to the highest, in my case 8000.
- Drill the pendants through their sides using a hand drill.
- Give each a pendant a light coat of Renaissance wax on the backs and sides, then give them a good buff with an old rag or a dremel tool.
- Apply a layer of resin to each pendant. I like to use Ice Resin. If you aren't familiar with using resin see my full tips and tricks resin tutorial for help with that.
- Allow to cure for 24 hours.
- Divide your pendants up into two rough groups of predominantly yellow or blue to help keep the overall effect even after stringing. I'm going to string mine in a one yellow, one blue pattern.
- Cut a length of accu-flex. I like 16” long. String on a charlotte crimp and then a crimp. Leave a small tail of string and then squish the crimp. Bring the charlotte crimp back up and close it around the crimp. Open a jump ring and link that through the hole in the charlotte crimp. Put your clasp onto the jump ring and close the ring.
- Start your stringing with about 10 clear seed beads.
- Then add your pendants onto the accuflex in the order that you have decided on, with a single seed bead between each one.
- Finish off with about 10 clear seed beads.
- To finish your polymer clay necklace just repeat the steps with the charlotte crimps and clasp above.
In the video tutorial I show a lot of different tips and tricks to help get the most out of the process, so please do take a look at that.
Suggested links
Supplies
If you are
struggling with the Ice Resin, you can find a full Tips and Techniques
tutorial that walks you through the process on my Patreon community page or in my Etsy Shop.
If I have missed something, or you still have questions, please leave a comment below.
You can like my Facebook page or join the Jessama Tutorials Polymer Clay Community on Facebook to stay up to date with more polymer clay tutorials like this one as they are released.


Please leave your comments below: