You are here: Home >> Polymer Clay Earring Tutorials > Modern Steampunk Polymer Clay Earring Tutorial
Modern Steampunk Polymer Clay Earring Tutorial
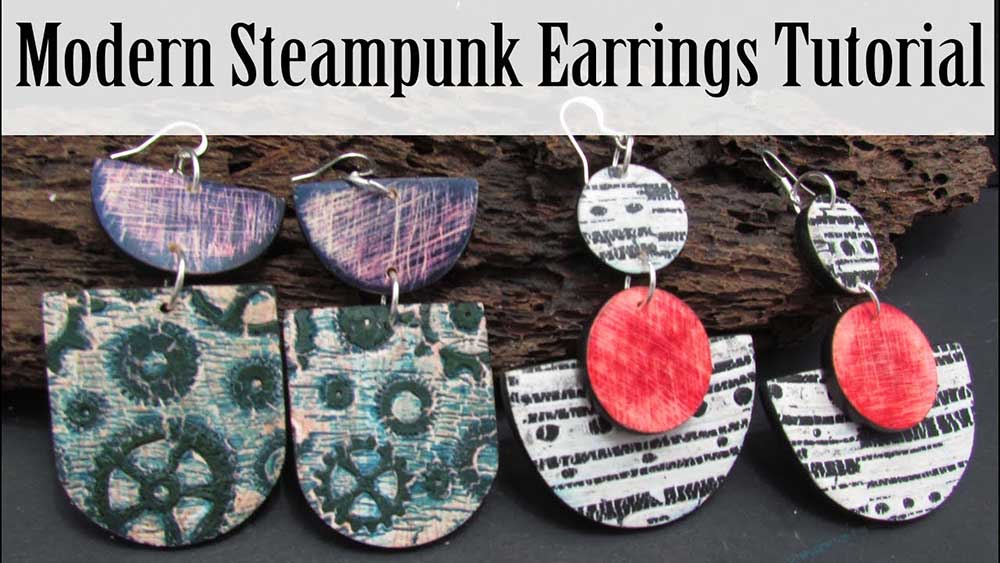
In this polymer clay earring tutorial I'll show you a really cool liquid clay twist on a Sutton Slice, which we will use to create two beautiful modern steampunk earring sets.
There are lots of tips and tricks in this polymer clay tutorial. I'll give you an in depth look at partial curing using a heat gun, show you a bunch of different things you can use 99% alcohol for, and much more.
You will need the following supplies:
- Ecru, white premo polymer clay
- Black and translucent liquid clay
- A flexible texture stamp (Helen Breil: Reading Between the Lines and Steampunk Cogs)
- Pastels (denim blue, assorted browns)
- Alcohol ink (Adirondack rust and crimson)
- A heat gun
- Cutters (arches, circles, semi ovals)
- Baby wipes
- A card
- 99% alcohol
- Cornflour
- Brush
- A pasta machine
- A tissue blade
- A craft knife
- An oven
- Course Sandpaper
- Polishing papers
- Pin Drill
- Renaissance Wax
- Buffing Wheel
- Large silver jumprings
- Pliers
- Silver Earring Wires
My Modern Steampunk Polymer Clay Earrings Tutorial Step by Step
Making the Steampunk Veneer- To start you’ll need a silicone, photo polymer or rubber steampunk texture sheet (I'm using my Raised Steampunk Cogs Texture), a sheet of white clay rolled out on the thickest setting of your pasta machine and a selection of brown pastels.
- Cut your clay roughly into 6 slices, then scrape your brown pastels randomly over the clay. Use your fingers to tap the pastel down.
- Turn your clay over and repeat.
- Twist the slices of clay together and then roll into a ball.
- Roll into a sausage and chop down the middle with your tissue blade.
- Put the two halves together, white side facing out and roll and twist some more. Continue rolling and compressing to create a light wood grain. (See the video)
- Flatten your log into a thick slab. Check for air bubbles and slice them out using your craft knife.
- Roll out using your acrylic rod, then pass through the pasta machine on the thickest setting, and then the middle setting (about 1mm).
- OPTIONAL: remove some of the pastels from the surface using alcohol and a wet wipe.
- Bring over your texture stamp.
- Squeeze out some translucent liquid clay onto your work surface and scrape some denim blue pastel into it. Mix with a skewer until the clumps are mixed in.
- Use your skewer or a brush to cover your stamp with liquid clay. Make sure to fill in all the grooves.
- Use a plastic card to scrape away the excess liquid clay.
- Partially cure using your heat gun on a medium heat and low speed.
- As the clay cures, it will start to darken.
- Once a skin has formed, flip the stamp and cure from the back.
- See the video to get an idea of how long the process should take.
- Leave to cool.
- Use your card to scrape a very light layer of translucent liquid clay over the surface of the stamp.
- Press the stamp, liquid clay side down, fairly hard onto your wood grain sheet. Work your way across the stamp and watch for the liquid clay coming out of the stamp.
- Very carefully lift up the stamp.
- Trim up the clay edges.
- Leave to set for a while.
- While you wait, mix up one part Ecru to two parts white and roll through the thickest setting on your pasta machine.
- Cover the clay with scraped denim pastel. Smooth over with your fingers and set aside.
- Bring back your steampunk veneer. Spray with alcohol and dab away the excess.
- Cover the clay with deli paper and press down on the clay. The partially cured liquid clay should begin to crackle.
- Continue with your acrylic roller.
- Stretch a little with your fingers to increase the crackle.
- Cover your rubber stamp with black liquid clay and scrape with your card. Clean it all up as before.
- Partially cure with your heat gun.
- Leave to cool and then scrape away the excess from your stamp using your tissue blade.
- Roll out a sheet of white polymer clay on the thickest setting of your pasta machine.
- Lay your sheet over your stamp, dust with cornstarch, and press down hard.
- Flip over and press from the other side, then gently peel away your stamp.
- Cover with deli paper and smooth the veneer, then stretch it using your fingers.
- Set aside your veneer.
- Take another sheet of your mixed Ecru color and dab with alcohol ink. I'm using Adirondack Rust and Crimson.
- Clean your dabber with a wet wipe sprayed with alcohol, then dab it over your clay to start the blooming. Spray with alcohol from a distance for some smaller blooms.
- Take your leftover wood grain clay and some white. Slice as before and scrape over some brown pastels. Pat down with your fingertips.
- Twist and roll together as before.
- Press into a slab, flatten with your roller, then roll through the thickest and then the middle setting of your pasta machine so that it is about 1mm thick.
- Clean up with a wet wipe and alcohol as before.
- Lay the veneer, clean side down, on your tile. Lay your other four veneers on top and press down.
- Separate the veneers using your craft knife.
- Start with the steampunk veneer.
- Lay it face down on a plain sheet of paper and cut out 2 pieces using your chosen cutter. I am using my arch cutters for this.
- Next, bring over the denim blue veneer, trim it up and cut out two pieces. I am using a small half oval cutter.
- Thirdly, cut two large half ovals from the reading between the lines veneer.
- Fourthly, cut two small circles from the red veneer.
- Finally, cut two small circles from the reading between the lines veneer.
- Smooth your pieces out using your fingertips.
- Burnish all of your pieces gently onto a piece of plain printing paper.
- Bake for a full hour at the recommended temperature.
- Bring over your red circles and blue half ovals.
- Drag each piece across a piece of 40 grit sand paper. First one way, then again perpendicularly.
- Sand the edges of your pieces quickly using a 400 grit.
- Finish the edges off with black using the Jessama Smear.
- Bake again for half an hour.
- Use translucent liquid clay to stick your pieces together. See the video.
- Bake everything again for an hour.
- Use a pin drill to drill a hole through each piece as needed.
- Apply a light layer of wax to the fronts of each piece and buff using a soft cloth or rotary tool.
- Sand the backs using a 400 grit polishing paper.
- Buff the backs.
- Connect the pieces together using jumprings.
- Attach earring wires to the tops using jumprings.
Suggested links
Where to Buy Supplies
- Circle Cutters
- Arch Cutters
- Half Oval Cutters
- Raised Steampunk Cog Stamp
- Polishing Papers
- Buffing Wheels
- Pin Drill
- Deli Paper
- Where to Buy Liquid Clay and Alcohol Ink Dabber
If I have missed something, or you still have questions, please leave a comment below.
You can like my Facebook page or join the Jessama Tutorials Polymer Clay Community on Facebook to stay up to date with more polymer clay tutorials like this one as they are released.
You may also like:
You are here: Home >> Polymer Clay Earring Tutorials > Modern Steampunk Polymer Clay Earring Tutorial


Please leave your comments below: