You are here: Home >> Polymer Clay Bracelets and Cuffs > Driftwood Polymer Clay Bracelet Project
Driftwood Polymer Clay Bracelet Project
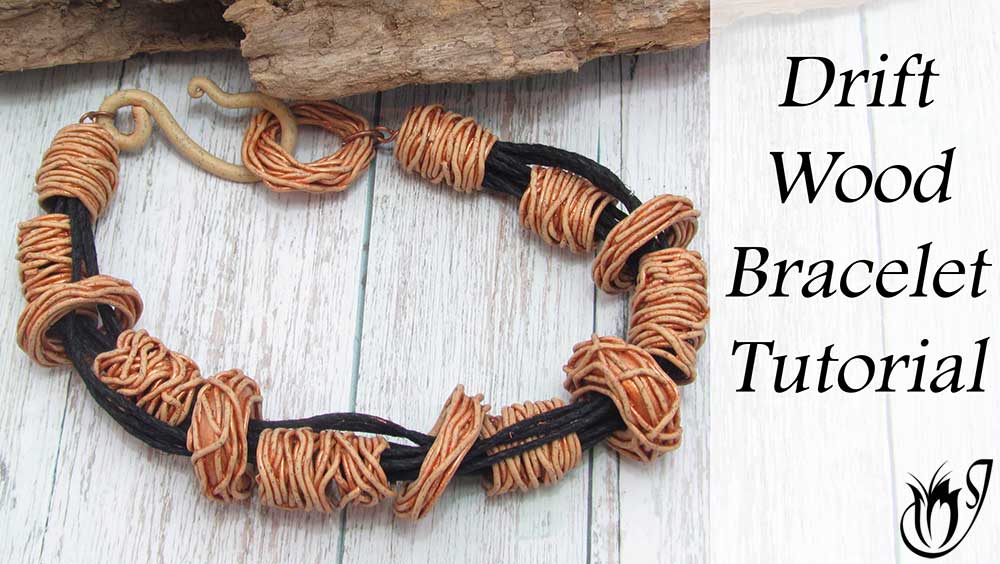
In this polymer clay bracelet project, I'll be showing you how to create a driftwood effect using extruded strands. I'll also be making end caps and a clasp from polymer clay.
You can use this same technique to create a necklace or earrings, and you can vary the colors of the hemp to give a completely different effect.
This is a quick and easy project, perfect for market jewelry. Have fun!
You will need the following supplies:
- Ecru polymer clay
- Embossing powders (bronze, ivory, copper, black)
- An extruder
- A wooden mandrel
- An oven
- A pasta machine
- Copper paint
- Wet wipes
- Black hemp
- Cord ends
- Copper head pins
- Copper jumprings
- Pliers
The Driftwood Polymer Clay Bracelet Tutorial Step by Step
Creating the Components- To start with you will need a sheet of Ecru clay rolled out on your thickest setting, around 2mm thick. You need about half a block of clay.
- Next we will be adding some embossing powders to the clay. I have Ivory White, Copper Brown, Black and Bronze.
- Add a generous amount of each powder to the top of your clay, fold the clay over and use your roller to mix it in. Once you get the powder somewhat mixed in, roll it through the pasta machine until it is completely mixed in.
- Fold the clay over, making sure there are no air bubbles and form into a log that you can fit into an extruder.
- Use a small circle disc, push your log intot he extruder, close it up and twist until you have long extruded snakes.
- Separate out any strands that got broken.
- Take one snake and arrange in the shape of a rose - see the video.
- Repeat a few times - I made four.
- Take another snake and make a tube bead by wrapping it around a wooden dowel - see the video.
- Repeat a few times, varying the length of the tube - I made three short and three long.
- Finally, roll a small piece of clay in the palms of your hands and flatten into a rondelle. Use a micro circle cutter to make a hole in it. Place it on the end of your dowel and then wrap a snake over it. Continue until you have good coverage and remove from the dowel - see the video.
- Repeat a few times - I made four of these.
- Place all of your pieces to the side.
- Next make another rose with a larger center - this will form one half of your clasp.
- Roll out a slightly thicker snake, taper one end and shape into a hook. Trim away excess clay and make a loop at the other end. This will form the other part of the clasp.
- Next wrap another snake around the end of your wooden dowel to form an end cap - see the video.
- Repeat to make a second end cap.
- Bake all of your pieces for an hour at the recommended temperature (leave your bead caps on the dowel).
- Choose a color of hemp for stringing, then choose a co-ordinating paint.
- Use a brush to work the paint over each piece being careful to get into all the nooks and crannies.
- Use a tissue to wipe away most of the paint. Allow to dry, then continue with a wet wipe.
- Cut several lengths of hemp and crimp with a cord end, (you may need to split into two sections).
- Hook a copper eye pin onto the end of your cord end then pull the wire through the end of your bead cap (you may need to drill a hole). Make a loop on the end of the wire and trim away excess.
- Use a copper jump ring to attach your clasp.
- Lay your pieces out in your preferred pattern, then string each piece onto your strings. See the video for the process.
- Repeat the process to finish off the other end with the end cap and clasp.
links to Supplies
If I have missed something, or you still have questions, please leave a comment below.
You can like my Facebook page or join the Jessama Tutorials Polymer Clay Community on Facebook to stay up to date with more polymer clay tutorials like this one as they are released.
You may also like:
You are here: Home >> Polymer Clay Bracelets and Cuffs > Driftwood Polymer Clay Bracelet Project



Please leave your comments below: