You are here: Home >> Polymer Clay Bib and Collar Necklace Tutorials > Down Under Polymer Clay Bib Collar
Down Under Polymer Clay Bib Collar Tutorial
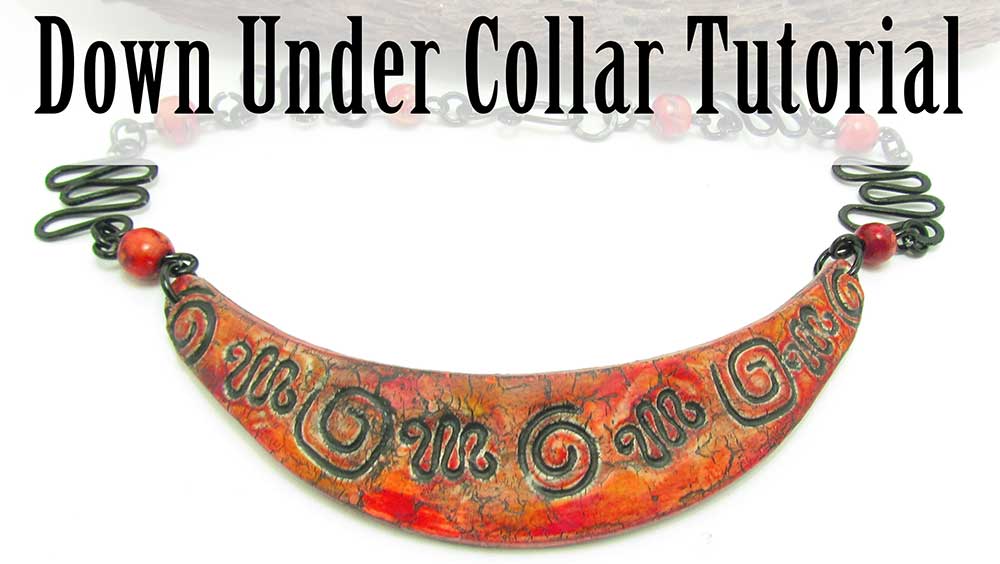
In this polymer clay bib collar tutorial we will be making an antiqued, crackled boomerang collar that resembles aged pottery.
In this tutorial I have used a tribal theme and earthy colors, but you could swap these out to create many different effects.
This polymer clay project was great fun to make. I hope you enjoy it.
You will need the following supplies:
- White and black polymer clay (Premo)
- Pastels (white, red, orange, yellow, rust)
- Tribal polymer clay stamps
- Large boomerang cutter
- A necklace stand
- A heat gun
- An oven
- A brush
- Deco Art Perfect Crackle
- Black paint
- A wet wipe
- Liquitex matt varnish
- A pin drill
- Black zebra wire
- Red wooden beads
- Pliers
- A hammer
- A Steel Block
How to Make the Downunder Polymer Clay Bib Collar Step by Step
Making the Polymer Clay Bib- To start with, you will need a sheet of black Premo and a sheet of white Premo, both rolled out on the thickest setting of your pasta machine (about 2mm thick).
- Lay the white sheet on top of the black sheet.
- Place on a piece of plain paper and cover with a second sheet. Lightly burnish with your fingers to make sure there are no trapped air bubbles.
- You will also need a cutter. I'll be using my Large Boomerang Bib today.
- Cut out a piece from your clay using your cutter.
- Separate the white and black leftover clay.
- Lightly burnish and smooth off your cutout piece.
- You will need some stamps for the next step. I'll be using my Tribal stamps.
- Use your stamps to mark out a pattern on your clay. See the video for the pattern I used.
- Cut again with your cutter to neaten up the shape and smooth off the edges.
- Scrape a fair amount of white pastel across the Boomerang. Use a soft brush to tap the pastel down, taking special care to get it into the stamped crevices.
- Brush away the excess, then gently wipe with a wet wipe to remove the white pastel from the raised areas.
- Choose a selection of red, orange, yellow and rust pastels.
- Scrape a small pile of powder from each pastel onto your work surface.
- Clean your fingers then use your fingertip to brush the pastels onto the clay, beginning with the lighter colors. See the video for the blending process. Don't forget to do the edges.
- Place your bib on a necklace stand or a bowl and set with a heat gun on the middle setting. You could leave the piece flat if you prefer.
- Allow to cool on the stand or bowl then bake for an hour in the oven on a bed of support cloths to maintain the shape.
- After baking, sand the back using polishing papers, starting with the 400 grit up to 8000.
- Use a brush to paint a light layer of Deco Art Crackle Medium Step One on the front, making sure to get into the crevices and around the edges.
- Add some thicker layers randomly across the raised areas.
- Allow to dry completely before applying step two.
- Once dry, cover with a good layer of step two of the crackle medium, making sure to get into the crevices and around the edges.
- Leave to dry very well for 2-4 hours.
- Use your fingertip to cover the whole collar with black acrylic paint, making sure to rub it into the cracks and the indented areas. Use a brush to push the paint in.
- Gently begin removing paint using a wet wipe.
- Allow to dry.
- You need a steel block, black wire, a cloth, a ball point hammer and a round nose plier.
- Use your pliers to bend your wire pieces into waves to mimic the pattern of the tribal stamps. Make a loop at either end. See the video
- Place one piece at a time on your cloth covered steel block, cover with a second cloth and gently hammer. Polish with your cloth. You'll need about six pieces.
- Seal with your choice of varnish. I am using Liquitex Matte Varnish.
- Allow to cure.
- Use a drill to drill a hole in either end of your bib collar.
- Use a mandrel plier to create two jump rings from your black wire. See the video.
- Thread one jump ring through each hole.
- Use a mandrel plier to create more jump rings from your black wire.
- Bring over four beads of your choice, thread a piece of wire through each one, and create a loop on either end.
- Use your jump rings to make two chains alternating between your wire coil pieces and your bead connectors.
- Link one chain to either side of your bib collar and attach a clasp to the ends of each chain.
- On the video I show how to make your own clasp using the black wire.
Suggested links
- Waterfall Crackle Polymer Clay Necklace Tutorial
- Basic Collar Tutorial (with detailed instructions for setting the collar after baking)
Supplies
- Boomerang Bib Collar
- More Collar Cutters on JessamaDesign
- Tribal Stamps
- Display Stand on FireMountainGems.com
- Pin Drill
- Polishing Papers
If I have missed something, or you still have questions, please leave a comment below.
You can like my Facebook page or join the Jessama Tutorials Polymer Clay Community on Facebook to stay up to date with more polymer clay tutorials like this one as they are released.
You may also like:
You are here: Home >> Polymer Clay Bib and Collar Necklace Tutorials > Down Under Polymer Clay Bib Collar Tutorial



Please leave your comments below: