Lily Pond Polymer Clay Bead Necklace Tutorial
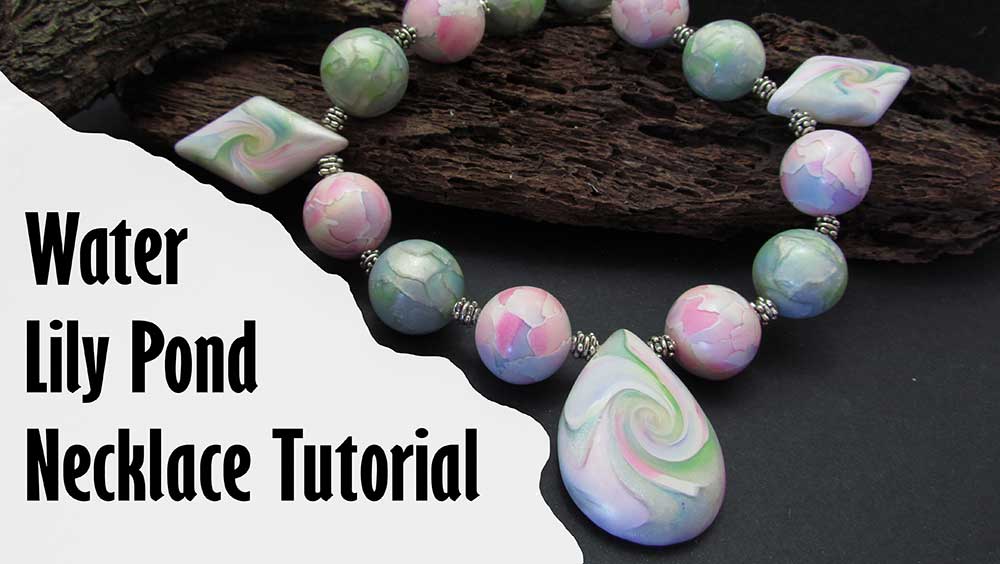
In this tutorial we will be making a Lily Pond polymer clay bead necklace using the torn paper or watercolor technique and Gelatos. I'll show you how to create different effects depending on which background clay you use.
We will also be rolling some beautiful lentil beads from our watercolor veneers and molding them into various cabochon shapes.
I've also included a fairly detailed description of the drilling process in this video, so if that is something you struggle with, make sure you watch right to the end.
You will need the following supplies:
- Pearl white, white, translucent polymer clay (Premo)
- Gelato’s (Boysenberry, Snow cone, Lime, Bubble Gum, Passion Fruit, Lavender)
- A tissue blade
- A pasta machine
- An acrylic roller
- An oven
- An acrylic block
- Tissues
- Plain paper
- Gloves
- Varathane
- Pin drill
- Wire
- Accu-flex
- Silver spacer beads
- Silver clasp
- Silver charlotte crimps
- Silver crimps
- Silver Jumprings
The Lily Pond Polymer Clay Bead Necklace Step by Step
Making The Watercolor Veneers:- To start you’ll need a sheet of white Premo polymer clay rolled out at 1mm thick.
- You will also need mixed media to color your clay with. You can use, paint, gilders paste, alcohol inks, mica powders or pastels. Today I will be using Gelatos - Bubblegum, Lavender, Passion Fruit and Boysenberry.
- Put together your chosen color palette, and streak your colors across your clay.
- Roll out a sheet of translucent clay on your thinnest setting, and smooth it carefully over your colored sheet.
- Run through on your middle setting, then again on the next setting down.
- Next you’ll need a sheet of pearl white Premo polymer clay rolled out at 1mm thick.
- On this one I will be using Lime, Snowcane and Boysenberry Gelatos.
- Cover with translucent again and run through on the same pasta machine settings.
- Take your first veneer and rip into small pieces.
- Roll a piece of scrap clay into a ball to form the core of your bead.
- Place pieces of your veneer onto the core in an overlapping fashion.
- Wearing gloves, roll the ball in your palms until all the slices are flattened and there are no seams.
- Repeat for as many beads as you like.
- Repeat with the second veneer.
- Place the beads on tissues for baking at the recommended temperature for an hour with a sheet of paper over the top for tenting.
- Roll a piece of translucent, pearl white or white clay into a ball. Cover with small pieces ripped from your veneers. For the lentil bead I will be using the two veneers together.
- Wearing gloves, roll the ball in your palms until all the slices are flattened and there are no seams.
- Use an acrylic block to roll the ball until a swirl pattern develops. (See the video).
- Flatten your bead and mold into a teardrop.
- Choose the side with the pattern you like the best and place that pattern face up.
- Use your fingers to dome the edges.
- Place the cabochon on a piece of deli paper and push it down a little to smooth out the back.
- On the video I also show how to make a diamond shaped lentil, so have a look at that.
- Bake at the recommended temperature for an hour with a sheet of paper over the top for tenting.
- Use a pin or push drill to drill a hole through the center of each bead. See the video for details of this process.
- Thread the beads onto a piece of wire and dip them in your varnish, or use a brush. (See the video for the process I use.)
- Each bead will require about three coats with half an hour drying time between.
- Allow to cure for two hours when all of your layers are complete.
- When the varnish has dried, remove your beads from the wire.
- Cut a length of stringing material. I am using Accu-flex.
- Add your charlotte crimp, crimp and clasp to one end of the cord.
- String your beads with your lentil teardrop in the center and your diamond lentils half way up either side and spacer beads in between.
- Finish off the other end with your charlotte crimp and clasp.
I hope you enjoyed that. Have fun and try out some different colors and mixed media. You can create endless combinations with this easy polymer clay watercolor technique.
Suggested links
Buy Supplies
If I have missed something, or you still have questions, please leave a comment below.
You can like my Facebook page or join the Jessama Tutorials Polymer Clay Community on Facebook to stay up to date with more polymer clay tutorials like this one as they are released.


Please leave your comments below: