You are here: Home >> Polymer Clay Pendant Projects > Polymer Clay and Wirework: Evening Pine Forest Project
Polymer Clay and Wirework: Evening Pine Forest Project
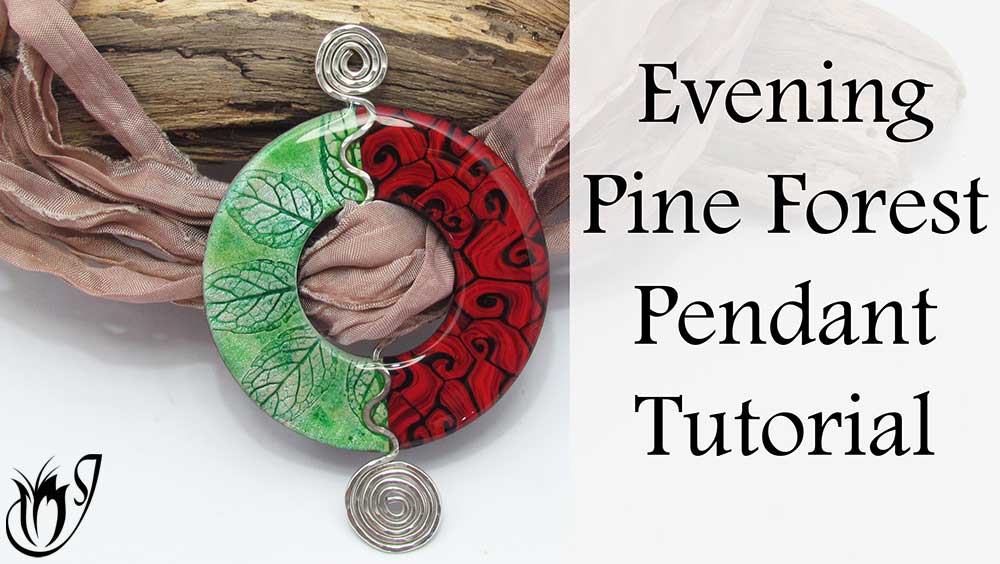
In this polymer clay and wirework tutorial I'll revisit the popular Starry Night technique and
another technique involving mint leaves. I'll also show a new stringing
method using wire and sari ribbon.
This tutorial is full of
cool tips and tricks and the design works really well with most veneers ,
so feel free to use any veneers you want with it. Have fun.
You will need the following supplies:
- Polymer clay Premo (Alizarin crimson, Cadmium red, Pomegranate, pearl white and black)
- Tissue blade
- Pasta machine
- Acrylic roller
- An oven
- Mint leaves
- Circle Donut #4 - 6cm
- Semi Circle#4 Maxi Cutter 1
- Sandpaper texture
- Pastels
- Silver wire (16 gauge)
- A hammer
- Pliers
- Deli paper
- A brush
- Translucent liquid clay
- Resin (Magic gloss)
- Sari ribbon
- Silver clasp
- Silver Jumprings
- Silver cones
- Silver cord ends
The Polymer Clay and Wirework Evening Pine Forest Project Step by Step
Creating the Leaf Veneer- To start with, you will need your cutters. I am using my #4 6cm donut, and the smallest #4 Semi Circle Donut from my maxi set.
- Next you will need a sheet of Premo pearl white polymer clay rolled out at about 2mm thick.
- Burnish your clay onto your tile then press down on the clay using the semi circle donut, just enough to create an impression.
- Press some mint leaves in a radial pattern, vein side down, into the clay.
- Cover with deli paper and burnish flat.
- Lift from your tile using a tissue blade and then gently remove the mint leaves.
- Gently stretch your clay to widen the veins and then cut out.
- Choose a selection of green pastels. Choose the darkest one and scrape it, using a craft knife, over your clay.
- Use a soft brush to gently tap the pastel onto the clay, then brush to remove the excess making sure to get pastel into all the veins.
- Wipe the surface with a wet wipe to remove some of the pastel. You can use alcohol to speed up the process.
- Add some of your lighter colors, trying to stay out of the leaf shapes.
- To start with, you will need some red clay. I am using Premo Cadmium Red, Alizarin Crimson and Pomegranate. You need a small amount of each, roughly equal pieces of each color.
- Take each color and roll it into a log.
- Press the logs together and roll and twist to create a marble. Chop with a tissue blade and press back together.
- Roll out a sheet of black polymer clay to 1mm thick and wrap the log with it.
- Reduce the log to a thin 4mm snake.
- Chop into random sections, pinch the end of each one and roll into a tapered tail and then roll into a spiral, tapered end to the center.
- Place your spirals together to create a sheet. Remember to keep it roughly in the shape of your Semi Circle Donut cutter.
- Cover with deli paper and burnish flat. Turnover and repeat.
- Run through the thickest setting of the pasta machine.
- Burnish onto your tile and then shave off the top using a tissue blade.
- Roll out a thin sheet of black clay around 0.5mm thick. Place the Starry Night veneer on top of it. Trim it out and run through the thickest pasta machine setting - around 2mm.
- Burnish again and then cut out using your Semi Circle Donut Cutter.
- Roll out a 2mm sheet of black clay.
- Texture using a spiral roller and trim.
- Turn upside down then place your two semi circles on top of it.
- Burnish with deli paper covering it to join the seams.
- I decided to smooth the back off too - I will re-texture later.
- Cut out using your donut cutter, and pick out the middle using a needle tool.
- Retexture the back using coarse sandpaper.
- Recut using your donut cutter.
- Cut off a length of 16 gauge silver wire. Straighten it out and clean it using a polishing cloth.
- At one end create a coil and then make a 90 degree angle in the remaining wire.
- Use your round nose pliers to bend the rest of the wire back and forth into a snake shape.
- Continue until the snake is the length of your cutter then create another right angle and another spiral.
- Hammer the wire with the flat side and then the ball point of your hammer.
- Use your pliers to correct any distortion in the shape and shorten to the right length. Flatten with the hammer.
- See the video for details.
- Polish the wire with a silver polishing cloth.
- Center your wire piece over your donut and gently press it into your clay.
- Place on a clean piece of deli paper and bake for an hour at the recommended temperature.
- Once cooled, pop off the wire, then use black polymer clay to finish up the edges using the Jessama Smear Technique.
- Add a very small amount of translucent liquid clay into the groove left by the wire, then replace the wire piece.
- Bake for a further 30 minutes.
- I am using Lisa Pavelka's Magic Gloss to resin the donut.
- Place your pendant on a silicone resin mat.
- Carefully cover your pendant with Resin and drag it to the edges. Add more resin if it pulls away from the edges and repeat. Keep repeating until there is no more pull away. See the video for the technique.
- Leave to cure under a UV lamp.
- Gather 6 pieces of Sari ribbon and cut them to equal lengths. Thread through the middle of your donut.
- Take three pieces and finish off with a cord end. Repeat with the other three pieces.
- Create a loop in a piece of wire and thread the two cord ends onto it. Cover with a cone and finish with another loop. Attach a clasp using a jump ring.
- Repeat at the other end.
Suggested links
supplies
If I have missed something, or you still have questions, please leave a comment below.
You can like my Facebook page or join the Jessama Tutorials Polymer Clay Community on Facebook to stay up to date with more polymer clay tutorials like this one as they are released.
You may also like:
You are here: Home >> Polymer Clay Pendant Projects > Polymer Clay and Wirework: Evening Pine Forest Project


Please leave your comments below: