Midnight Wood Pendant Polymer Clay Tutorial
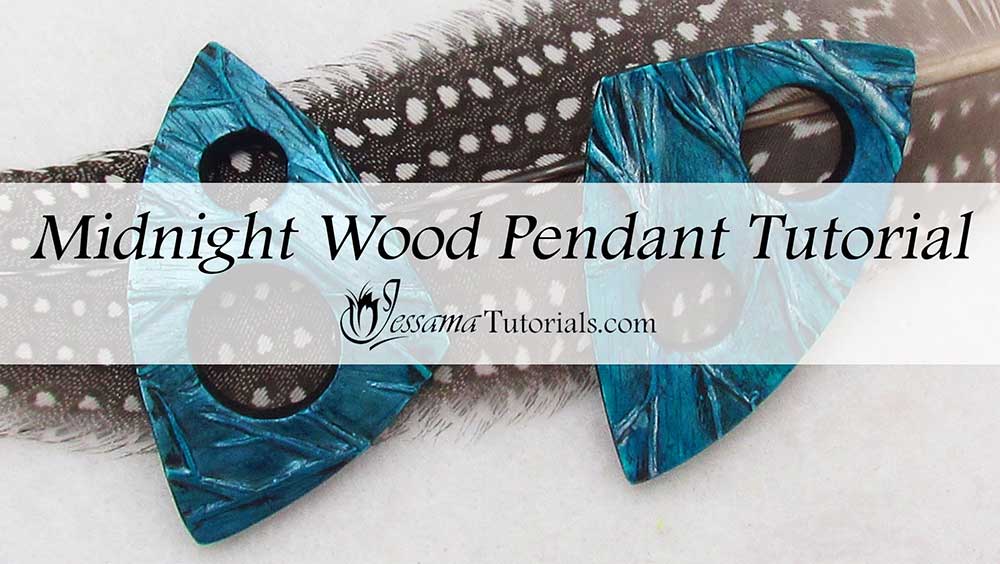
In this Midnight Wood Pendant
Polymer Clay Tutorial I’ll show you how to
make two pendants, one flat, one curved, using a hand-carved texture stamp.
I showed you how to make the texture stamp in part one of this tutorial. This
is the second part in the three part series. In the next part, I’ll show you how
to string the
pendants.
The links to the first and third part of this polymer clay tutorial, as well as the shape template for the pendant, can be found in the box below the video.
You will need the following supplies:
- White and black polymer clay (I’m using Premo)
- A tissue blade
- A pasta machine
- An acrylic roller
- A paint brush
- Black paint
- A craft knife
- A texture stamp (I’m using the Dead Wood Stamp from part one also available on Etsy)
- A texture for the back (I’m using a pebble acrylic roller from eBay)
- Alcohol ink (I’m using Adirondack Mermaid, Turquoise, Pool, Patina and Silver)
- Silver mica powder
- A glass jar
- Graduated circle hole cutters
- Black liquid Kato clay
- An oven
- Wet/dry sandpaper or polishing cloths
- Renaissance wax
Midnight Wood Pendant Polymer Clay Tutorial Step by Step
- To start you’ll need a piece of white polymer clay rolled through on the medium setting of your pasta machine. (Setting 5 on my machine)
- Place your stamp on your work surface and spray well with water.
- Lay your polymer clay sheet over your stamp. Spray the top with water.
- Press the clay into your texture stamp using your fingers, working from one side of the stamp to the other to expel air bubbles and excess water.
- Roll over carefully using your acrylic roller. Stop immediately if you see your clay begin to lift. If you continue you will end up with a ghost image.
- Lift the clay carefully from the texture stamp to reveal the pattern.
- Dry your clay and work surface.
- Trim the edges of your clay to neaten it up.
- Now you need to choose an area to cut your two pendants from. You can use your own cutters or the shape templates available for download in the box below the video.
- Cover one of your pendants with a good layer of silver mica powder using a paint brush.
- Cover both pendants with a layer of alcohol inks using a brush. You can use any color you want, but I’m using Adirondack Pool, Mermaid, Turquoise, Patina and Silver. Just cover them randomly with color patches, but make sure to add the Silver ink last (I'm only adding silver to the pendant without the mica powder.) Don’t worry if they look a little light right now. We’re going to cover them with more layers of ink later. (See the video for more details on this process.)
- Now cut out two circular holes in each pendant. Leave them to dry for the moment.
- For the backing you need some black clay rolled out on the third thinnest setting of your pasta machine.
- Press a texture into the clay. I’m using a pebble texture roller I got from eBay.
- Cover the texture with silver mica powder using your brush. Now flip the texture so that the texture is face down.
- Place your pendants onto the piece of black clay and gently tap to get good contact. Cut out their shape and the holes.
- You can bake one of these textures flat and the other one you need to place over a curved surface. I'm using a glass jar.
- Bake at the recommended temperature for forty minutes and then let the pendants cool.
- To finish off the outside edges, add black clay to the edges using the Jessama Smear Technique.
- Scratch the surface of the front of the pendants with your craft knife.
- Spread another layer of alcohol ink over the pendants and leave to dry for a few minutes.
- Finish off the inside circles by painting a thin layer of black liquid clay around the sides.
- Bake for another half an hour.
- Once cool give the pendants another layer of alcohol ink and allow to dry.
- Antique the pendants by brushing black paint all over the pendants using a paint brush. Spend time making sure to get the paint into the crevices.
- Rub most of the paint off with a cloth. You can wet your cloth if you need to.
- Bake for another half an hour.
- When cooled give the back and sides a good sand. Only sand the raised areas of the backs as you want the indented areas of the texture to keep the silver mica powder. Don't sand the fronts.
- Seal the pendants with renaissance wax and buff.
Your pendants are now ready to be made into a piece of polymer clay jewelry. I'll show you how to do this in part three.
Suggested links

- Right-click on the image.
- Select "copy image".
- Paste into a blank Word document.
- Print and cut out the shape.
- Midnight Wood Pendant Polymer Clay Tutorial Part One - Texture Stamp
- Midnight Wood Pendant Polymer Clay Tutorial Part Three - Completing the Project
- More Information on How to do the Jessama Smear
- Colors of the Rainbow Skinner Blend Tutorial
Where to Buy Supplies
If I have missed something, or you still have questions, please leave a comment below.
You can like my Facebook page or join the Jessama Tutorials Polymer Clay Community on Facebook to stay up to date with more polymer clay tutorials like this one as they are released.


Please leave your comments below: